|
|
GameSpot
news
See Also
User Services
Sponsored Sites  |
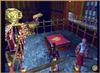
 Barkhang Monastery ...continued Prayer Wheel 1 Stow the key and return to the main balcony, pressing forward into new territory. The balcony terminates in a small room. Beware boulder traps as you make your way up the narrow passageways. Turn left when you get to the T-intersection (and after triggering the second boulder trap), and run to the top, halting at the edge of the whirlpool. If, in your impatience to nab the first Prayer Wheel, you dive headlong into the water, you will drown - the suction in the center of the pool is merciless. If, however, you turn around and slip into the water, hug the wall as you work your way clockwise around the pool, you'll be fine. Make for the obvious underwater opening and slog up the ramp to the hole in the floor. Drop down and turn right. Evading the sliding doors is simply a matter of timing. Atop the ladder, head for the dark doorway. Ignite a flare and behold the first Prayer Wheel in the near-left corner. Sideways jump over the gold fire pots to the Wheel.
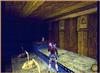
After acquiring the artifact, sideways jumps over the fire pots is the safe way out. Good luck. Return to the room outside the Prayer Wheel room and locate the boxes in the right wall. Pull the box in the middle of the room aside, then pull the other out of the wall. Follow the passage up the ladder and would you know it? You're back in the boulder hallways. Retrace your steps to the main floor of the monastery. Now's the time to use that Main Hall Key of yours. Barkhang Monestary, continued...
|
|||||
| |

|