T H E   G A M E S P O T   N E T W O R K


GameSpot
  action
  adventure
  driving
  puzzle
  role-playing
  simulation
  sports
  strategy
  hardware

  news
  reviews
  previews
  hints
  downloads
  top games


See Also
  videogames.com
  gameguides.com


Subscribe to our
free newsletter


Search
by:


User Services
  join
  help
  feedback
  contact us
  ad index
  international
  vrml site map
  shop amazon.com
  play on HEAT.NET

Sponsored Sites
  HEAT
  HEAT.NET


FamilyPC


ZDNet


Tomb Raider II Survival GuideWalk-through
IntroductionBefore You Go...Guns and Bad GuysWalk-throughCheatsContents

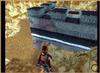
Barkhang Monastery ...continued

Prayer Wheel 5
Sure enough, the Trapdoor Key opens the trapdoor in the floor next to the key lock. Drop in and follow the passage. After you pull up, turn right and head through the tall, narrow doorway. Keep running until you encounter the open pillar area. Head for the far wall, veering right, and pull into the niche. Climb the ladder to the top. Drop to the ledge, step outside, take a right on the outdoor ledge, and make your way to the small building.

In the building area, note the ramp just to your right as you enter. Jump to the top, then leap to the ledge beyond. From that ledge, jump across to the rooftop of the building.

Screenshot ScreenshotThe last Prayer Wheel is only a jump and a drop away. What are you waiting for?

Drop in the hole and locate the fifth and final Prayer Wheel of the mission (it's on top of the box).

Pull the switch to escape the building, then return to the Buddha room. As you face Buddha, head for the room to the left (underneath Buddha's right hand). Place each of the five Prayer Wheels in their respective wall sockets, then enter the chamber you reveal. Mount the ramp and let Lara place the Seraph Key. Then make for the exit; your work here is done.

Next Stop: Catacombs of Talion

Back Next


Copyright © GameSpot Inc.