|
|
GameSpot
news
See Also
User Services
Sponsored Sites  |
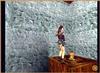
 Barkhang Monastery ...continued Prayer Wheel 3
Dash down the passageway, ducking into the first doorway you encounter on the right. Move the boxes around in the first room if you like - especially if you're running a little lean on ammo. Press on past the barrels, avoid the obvious trapdoor in the floor (the fall can be a killer). Draw your guns when you turn right at the T-intersection. Even if you're at peace with the keepers of the temple, this next sequence is still going to hurt. Hang the first left you come to and run like hell up the stairs and through the window to escape a goon squad ambush. You need all the open space you can find, and this passageway is woefully inadequate for someone with Lara's fighting style. Once through the window, turn right and yank the switch you find to open the large, tall double doors. If the Monks are your friends, they'll dash down the corridor and do battle with the bad guys. If everyone hates you - good luck and we hope you have a lot of Medi Packs to spare. Make your way through the large arches, opposite the large, tall double doors, and climb, climb, climb the ladders you find. Keep an eye out for the final ledge - and the crate. Atop the crate is the third Prayer Wheel.
Barkhang Monestary, continued...
|
|||||||
| |

|