|
|
GameSpot
news
See Also
User Services
Sponsored Sites  |
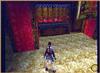
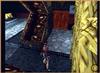
 Barkhang Monastery ...continued Prayer Wheel 2 Through the study room you'll encounter a swing blade hallway. Sideways jump over the first blade and enter the doorway on the left. Mount the boxes and search for the key - the Strongroom Key to be specific. Now it's just a matter of finding the Strongroom…. Exit the Main Hall the way you first entered, hang a right at the T-intersection of the hallway, and angle for the far left corner of the room you enter, wary of an ambush. Plug in the key and enter the Strongroom. Inside you'll find the Rooftops Key. Now it's just a matter of finding the Rooftops…. Return to the purple hallway and enter the rolling blade room (it's on the right - you can't miss it). Get to the left side of the room to dodge the shiny wheels of death. Plug the Rooftops Key in the lock and enter the passage you just opened. It's time to get that second Prayer Wheel, and a couple of Gemstones to boot. After dashing up the stairs, note the fire pots that line the alleyway ahead. Then dash toward the golden calves, hook around the right one and locate the switch in the room at the end of the corridor. Pulling it will temporarily douse the fire. You know what to do. Note that you can jump over the flames and not sustain any damage by using simple hop jumps. But it's tricky and time consuming. Past the fire pots, take your first left and run toward the pillar switch in the middle of the open area. After you pull the switch, drop through either of the trapdoors and locate the glass case in the room below.
Claim the Gemstones, find the ladder, and return to the rooftop. Dash back to the fire pot corridor, but turn left at the T-intersection, away from the fire pots. Atop the steps, you'll be confronted with a huge starburst. Opposite the starburst are a pair of golden idols, and a box in the wall between them. What do you want to bet a Gemstone fits in that box? Placing a Gemstone slides the starburst back. Slip past the starburst, turning left. Pull the box out a couple of notches and behold the second Prayer Wheel.
Barkhang Monestary, continued...
|
|||||||
| |

|